Spring Security & JWT
HTTP Stateless
HTTP(HyperText Transfer Protocol)는 클라이언트와 서버 사이에 이루어지는 요청/응답 프로토콜이로서, WWW상에서 정보를 주고받을 수 있는 프로토콜이다.
HTTP는 무상태 프로토콜이라는 특징을 지닌다. 때문에 연결이 되었을 때 요청에 대한 처리만 하면 되어, TCP/FTP와 같은 상태 저장 프로토콜에서 상태를 유지하기 위해 연결을 유지할 필요가 없다. 연결을 계속 유지해야 한다면, 불특정 다수의 요청을 모두 수용하기 힘들 것이다.
Session/ Cookie
HTTP는 무상태 프로토콜이다. 하지만 우리는 웹을 이용하다보면 상태가 필요할 때가 있다. 예로 로그인을 한번 하고 난 후 페이지를 옮겼다고 해서 다시 로그인을 하지 않아야 하고, 장바구니에 담아놓은 상품이 페이지를 옮겨다닌다 하여 사라지지 말아야 한다.
따라서 이러한 무상태 프로토콜에서 요청자의 상태를 유지하기 위한 방법으로 Session과 Cookie가 있다.
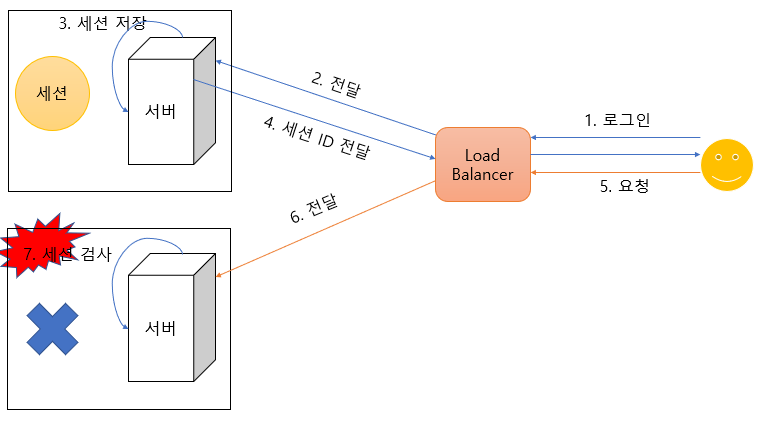
세션은 서버에서 연결을 통해서 최초 세션 ID라는 유니크한 ID를 세션 저장소에 저장하고, 이 ID 값을 요청자에게 전달해준다. 사용자는 전달받은 이 세션 ID를 HTTP Header에 첨부하여 요청을 보냄으로, 자신임을 나타내는 것이다. 보통 서버에 저장하는 정보를 세션이라하고, 클라이언트에서 전달받은 세션 ID를 클라이언트에 저장한 파일을 쿠키라고 한다.
문제점?
세션/쿠키를 이용하여 인증을 할 때에는 아래와 같은 점을 유의해야한다.
1) 저장된 세션의 위치
예시를 조금 들면 아파치 톰캣의 경우 사용자의 세션을 컨테이너(톰캣 컨테이너)에 저장하게 된다. 여기서 가용성 있는 서비스를 만들기 위해 다수의 서버를 사용하게 되었을 때, 어떠한 문제로 인해 다른 컨테이너쪽으로 요청이 넘어가게 된다면 로그인을 분명 했는데 재 요청했을 때 다른 컨테이너로 들어가게 되면서 세션이 없다고 판단할 수도 있다.
2) 세션을 저장하기 위한 스토리지
위의 문제를 해결하기 위해 세션을 공통적으로 저장할 수 있는 저장소를 만들게 되었을 때, 예를 들어 Redis에 저장하게 된다면, 수많은 사용자의 세션을 저장할 메모리 공간이 필요하게 되고, Redis에서 세션을 검색하는 비용(네트워크 시간+검색 시간)이 생길 것이다.
토큰을 통한 인증
토큰을 이용한 인증은 간단하게 설명하면 아래와 같다. 기존의 세션 ID와 같이 서버는 특정한 알고리즘을 통해 특수한 문자열(token)을 클라이언트에 저장하고, 클라이언트는 매 요청마다 이 특수한 문자열을 전달하는 것이다. 세션/쿠키와 차이점이라면 서버가 이러한 토큰 값을 저장하지 않는다는 것이다. 서버는 이 해당하는 토큰이 자신이 특수한 알고리즘을 통해 만든 토큰인지 확인하는 과정을 통해 사용자가 로그인을 해야하는지 말아야하는지를 판단한다.
JWT
JWT(JSON Web Token)는 문자열 형식으로 리턴이 되는데, 이 문자열은 마침표를 기준으로 3가지 구조(헤더,페이로드,시그니쳐)를 가지게 된다.
- Header : 어떤 타입인지 어떤 알고리즘 등이 정의되어있음.
- Payload(Claims) : 실제로 어떤 데이터가 담기는 공간. 페이로드에 담기는 데이터는 암호화가 되지 않기 때문에 외부에 노출되면 안된다.
- Signature : 토큰이 위변조 되지 않았음을 증명하는 서명이 담겨있는 곳. 데이터를 일정하게 Hashing을 하고 Hashing된 데이터를 암호화해서 그 값이 나중에 검증을 했을 때 바뀌지 않았음을 증명하는 방식.
이러한 데이터는 JSON 포맷으로 만들어지지만 실제로 JSON 포맷으로 리턴해주면 안되기 때문에 Base64 URL Encoding이라는 방법을 이용해 이 데이터를 일정한 문자열로 바꿔준다.
JWT 적용하기
원하는 기능
-
Signature(서명)에 사용할 알고리즘 :
Hmac Sha 256 - 사용자로부터
email과password를 입력받는다. - 인증이 되었다면 사용자의
id와name을 이용해 만든 토큰을 내려준다. - 유저가 토큰을 이용한 요청을 했을 경우 필터를 이용하여 토콘의 유효성을 검사한다.
Maven
<dependency>
    <groupId>org.springframework.boot</groupId>
    <artifactId>spring-boot-starter-security</artifactId>
</dependency>
<dependency>
    <groupId>io.jsonwebtoken</groupId>
    <artifactId>jjwt-api</artifactId>
    <version>0.10.7</version>
</dependency>
<dependency>
    <groupId>io.jsonwebtoken</groupId>
    <artifactId>jjwt-impl</artifactId>
    <version>0.10.7</version>
    <scope>runtime</scope>
</dependency>
<dependency>
    <groupId>io.jsonwebtoken</groupId>
    <artifactId>jjwt-jackson</artifactId>
    <version>0.10.7</version>
    <scope>runtime</scope>
</dependency>
Gradle
dependencies {
    implementation 'org.springframework.boot:spring-boot-starter-security'
    implementation 'io.jsonwebtoken:jjwt-api:0.10.7'
    runtime 'io.jsonwebtoken:jjwt-impl:0.10.7',
    runtime 'io.jsonwebtoken:jjwt-jackson:0.10.7'
}
JwtUtils 만들기
public class JwtUtils {

    private final Key key;

    public JwtUtils(String secret) {
        this.key = Keys.hmacShaKeyFor(secret.getBytes());
    }

    /**
     * 토큰의 payload에 유저의 Id와 name 을 삽입
     * @param userId 유저의 id
     * @param name 유저의 name
     * @rturn jwt token
     * */
    public String createToken(Long userId, String name) {
        String token = Jwts.builder()
                .claim("userId", userId)
                .claim("name", name)
                .signWith(key, SignatureAlgorithm.HS256)
                .compact();

        return token;
    }

    /**
     * token 으로 부터 payload 를 추출하는 메서드
     * @param token JwtUtils 로부터 만들어진 토큰
     * @return token 의 payload(=claims)
     * */
    public Claims getClaims(String token) {
        return Jwts.parser()
                .setSigningKey(key)
                .parseClaimsJws(token)  //JWS = Signature 가 포함된 내용
                .getBody();
    }
}
application.properties 에 비밀키 선언
jwt.secret=12345678901234567890123456789012 #32글자 이상의 비밀키
필터 추가 : 요청 헤더의 토큰 정보를 SecurityContext로 변환
public class JwtAuthenticationFilter extends BasicAuthenticationFilter {

    private JwtUtils jwtUtils;

    public JwtAuthenticationFilter(AuthenticationManager authenticationManager, JwtUtils jwtUtils) {
        super(authenticationManager);
        this.jwtUtils = jwtUtils;
    }

    /**
     * SecurityContext 에 Authentication 객체 세팅.
     * */
    @Override
    protected void doFilterInternal(HttpServletRequest request,
                                    HttpServletResponse response,
                                    FilterChain chain) throws IOException, ServletException {

        Authentication authentication = getAuthentication(request);
        if (authentication != null) {
            SecurityContext context = SecurityContextHolder.getContext();
            context.setAuthentication(authentication);
        }
        chain.doFilter(request, response);
    }

    /**
     * 헤더의 Authorization로부터 토큰을 가져와 사용자의 정보를 담을 Authentication 객체로 변환
     * */
    private Authentication getAuthentication(HttpServletRequest request) {
        String token = request.getHeader("Authorization");
        if (Strings.isEmpty(token)) {
            return null;
        }

        Claims claims = jwtUtils.getClaims(token.substring("Bearer ".length()));

        return new UsernamePasswordAuthenticationToken(claims, null);
    }
}
Security 설정
@Configuration
@EnableWebSecurity
public class SecurityJavaConfig extends WebSecurityConfigurerAdapter {

    @Value("${jwt.secret}")
    private String secret;

    @Override
    protected void configure(HttpSecurity http) throws Exception {

        http.formLogin().disable()
                .csrf().disable()
                .cors().disable()
                .headers().frameOptions().disable()
        ;

        //JwtAuthentication필터 추가
        http.addFilter(jwtAuthenticationFilter())
                .sessionManagement()
                .sessionCreationPolicy(SessionCreationPolicy.STATELESS)
        ;
    }

    @Bean
    public BCryptPasswordEncoder encoder() {
        return new BCryptPasswordEncoder();
    }

    @Bean
    public JwtUtils jwtUtils() {
        return new JwtUtils(secret);
    }

    @Bean
    public JwtAuthenticationFilter jwtAuthenticationFilter() throws Exception {
        return new JwtAuthenticationFilter(authenticationManager(), jwtUtils());
    }
}
Controller
@RestController
public class ReviewController {

    @Autowired
    private JwtUtils jwtUtils;

    @PostMapping("/test")
    public ResponseEntity auth(Authentication auth) throws URISyntaxException {

        if(auth == null){
            throw new TokenNotExistedException();
        }

        return ResponseEntity.ok().body("success");
    }

    @PostMapping("/getToken")
    public String getToken(@RequestBody @RequestParam String email,
                           @RequestBody @RequestParam String password){

        if(email.equals("test@example.com") && password.equals("1234")){
            Long id = 1L;
            String name = "tester";
            return jwtUtils.createToken(id,name);
        }
        return null;
    }

}

@ControllerAdvice
public class ReviewErrorAdvice {

    @ResponseBody
    @ResponseStatus(HttpStatus.BAD_REQUEST)
    @ExceptionHandler(TokenNotExistedException.class)
    public String tokenNotExisted(){
        return "토큰이 존재하지 않습니다.";
    }

    @ResponseBody
    @ResponseStatus(HttpStatus.BAD_REQUEST)
    @ExceptionHandler(SignatureException.class)
    public String NotValidToken(){
        return "유효하지 않는 토큰입니다.";
    }
}
REST Client Tool을 이용해서 아래의 내용을 요청해본다.
-
token을 먼저 발급 받는다.
- Authorization 없이 요청 -> 토큰이 존재하지 않습니다.
- Authorization:Bearer eyJHdkfjalsdfkjasd.ldjkflkajlsdfkasdjf.sfjlsjfklsdjflsajflaskjflkasj -> 유효하지 않는 토큰
- 발급 받은 토큰을 이용해 요청 -> success